
How to Clean Laptop DVD Drive Lens?
The laptop is actually a wonderful device, an invention, which has, without doubt, has made our work faster, easier and enjoyable. Whether it is watching your favorite movie or listening to the latest song or you want to send an important email or search for anything on the internet.
Everything is possible with a device, which you can simply put in your bag and can carry it anywhere. But, it is inevitable, that over time, dust and dirt will affect your laptop. And, though it is really easy to clean a laptop screen and keyboard.
Over time, I have been asked by many people on how to clean the DVD drive of their laptop. And, I would strongly recommend cleaning that, because it is the part which many people forget to clean and end up with a broken one.
Contents
How to Clean Laptop DVD Drive Lens?
Plus, there are many ways to clean the DVD drive of your laptop. And, I have made the list of those which are efficient one. You can read them below and choose the method suitable for you, according to your convenience.
As for cleaning laptop DVD drive lens it regularly is as important as cleaning it once, so opt the method which you can do on a regular basis, without any hindrance or trouble.
-
Manual cleaning laptop DVD drive lens
First of all, make sure your laptop isn’t connected with any wire like a charger or cable, etc. It is important because while cleaning you have to use the liquid or move the laptop a bit recklessly, so it can result in the sudden electric current or any mishap, which can harm you as well as damage your laptop.
The next thing is to open your laptop’s DVD drive by simply pressing the Eject button on your laptop. Or you can right click on drive’s icon and select the option: Eject. Both will lead to the opening of your DVD drive, so you can clean it easily.
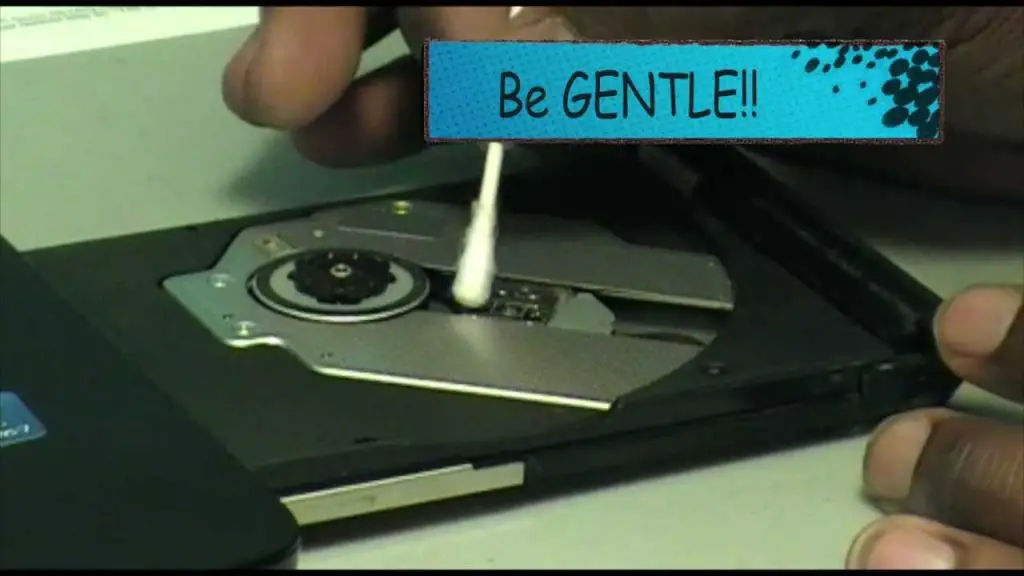
Now, blow the compressed air into your opened DVD drive, so any dust which has been accumulated there before can be cleaned. And, to make it thoroughly clean, also damp the cotton swab with warm water or preferably with alcohol and lightly rub it on the DVD drive.
Make sure the cotton swab is only lightly dampened, so you don’t end up with wetting the whole DVD drive. And, also make sure to rub it lightly and gently on the DVD drive, as sudden or heavy pressure can break it.
Now, wipe the DVD drive lens, with the cotton swab and as I have mentioned before do it gently and carefully. The DVD drive lens is really delicate, if it isn’t handled carefully, you can end up giving it scratch instead.
Finally, dab the DVD drive lens with a fresh cotton swab, this time. Make sure that the DVD drive lens is fully cleaned and dry before you close it or start using it again. This method is easy and fast and especially cheap if you have got time on your hand and you use your laptop mostly at home only.
But if you are a professional or a really busy person, who hasn’t got that much time on their hands to clean their laptop with so much effort and attention. Plus, you also travel a lot and your laptop does need cleaning then you can opt for the laser method. As it saves a whole lot of time.
-
Laser Lens Cleaning
The first step will be the same. Making sure your laptop isn’t plug in or any wire isn’t attached to it. then pressing the button, Eject or right-clicking and selecting the option, Eject. After that blowing the compressed air to remove ant accumulated air over time.
These are all the basic steps which are done when cleaning the DVD drive lens of the laptop. And, these steps are followed every time, no matter what kind of method you are using whether it is the manual method or lens method. What makes these methods different is the next steps. But following these basic steps is important and should be handled and given importance as much as the next steps.
Now, insert the laser lens cleaning disc in the drive of your laptop. And, then close the DVD drive while you have to be a bit patient and give time to your laptop to fully load the disc. After that, run the disc, on how to do that it depends upon the type of brand you are using. As the manner to follow the steps depend solely on the brand.
It is best and wise to look at the packaging of your disc or look for any instruction paper in cover or you can go to the website of the manufacturer and look for instructions over there. It is usually really easy and mentioned mostly on the packaging of the disc but sometimes, it may vary, so to be on the safe side you can look on the website or instruction paper.
Then, wait for the disc to do all the work for you, as unlike in the manual method where you have to clean with the cotton swab, in laser lens cleaning method, the disc does all the work. So, you can sit just back with the cup of coffee and couple of doughnuts and while you much on them happily, wait for the disc to finish running.
Once it is completed, a window will pop up on the screen and it will inform you that the process has been completed. Then, you can simply eject the disc and your DVD drive will be as new as before and ready to use. You have munched on your snacks and your DVD drive has been cleaned, now its time to work. You can get back to your busy day easily.
-
Stick cleaning method for laptop DVD drive
This method is actually really similar to the manual cleaning method. So, if you were following the first method and didn’t get the satisfactory results you wanted. But still want to clean your DVD drive manually, then this method is for you. Best about the manual method is it is cheap and if you have time to do it, then why not do it!
First of all, the basic steps should be followed. As they are unplugging your computer and turning it on. Then next is opening the DVD drive, whether you do it through pressing the Eject button or right-clicking and selecting the Eject option.
Next is using the compressed air to remove any accumulated dirt. After the basic steps have been followed, follow the next steps. And, in case you have tried the first method before, then you don’t have to follow the basic steps again. You can simply just move on to the next step as doing it, again and again, can also harm your DVD drive lens, instead.
Now, take a small piece of cloth and moisten the center of the cloth whether with warm water or isopropyl alcohol. It shouldn’t be much, don’t make the whole cloth wet, so it starts dripping instead. Make sure it is moisturized lightly only. If the cloth is dripping, then don’t use it, take another piece of cloth instead.
Now, attach the soft piece of cloth, which is moisturized lightly in the center and place it around the blunt stick. Then insert it into the DVD drive. And, carefully and gently move the cloth back and forth over the lens to clean it.
Be extra careful, to not rub it forcefully and make sure water isn’t dripping from the cloth on to the drive. Remove the cloth from the stick, when you think disc has been cleaned. And, allow it to dry before closing the DVD drive.
How I Clean my Laptop DVD Drive Lens?
Personally, I think Laser lens cleaning method is the safest and fastest and you have to spend money only once to buy the disc anyway. And, it is easily available in shops and Amazon. But, you can choose the method convenient for you or just go over all of the methods for once and choose the one you are comfortable with.
Don’t forget to clean it regularly, along with your laptop. And, know that you don’t have to wait till it covers with dust and dirt when you clean it. Make it a regular habit to keep your DVD drive clean along with your laptop. So, your laptop won’t have to go to a mechanic for a visit.
Team- Whatlaptops.com
Related Articles: